
Monday, May 4, 2009

DIY Tutorial: Baby's Breath Decor

With less than 50 days left, I understandably have lots to do.
But so many projects are done--I want to share them with you before life gets even busier!

I plan to DIY all my flowers, including decor for the ceremony and reception..and this post is just the beginning! 
Last Wednesday, I met my Aunt Jet for some flower-experimentation.  She had bought two bunches of baby's breath for $4 each from the local grocery store.
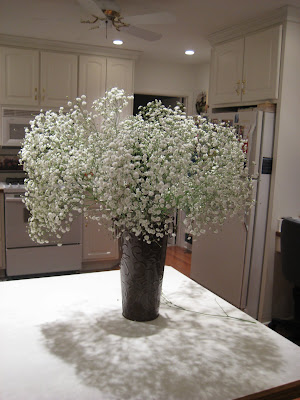

Previously, we had purchased three galvanized pails in different heights and sizes, and spray painted them brown.  The brown made them match our theme better and added a little bit of elegance as these will be in the church for our ceremony decor.


We took some floral foam, and cut pieces that would fit in the bottom of each pail.  They have to fit snig if you are going to fill the pails with water.

After filling one pail with water and realizing it leaked, we found old margarine, sour cream, and cottage cheese tubs and used them inside the pots to hold the water.

We cut the stems into a couple of different heights and used the broken stems to fill in along the edges of the bucket.
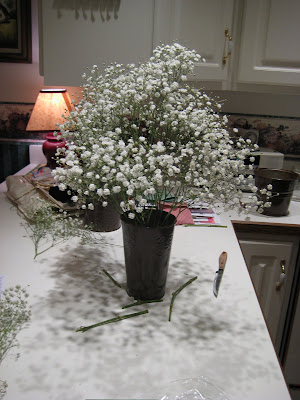
We figured out that we'd need two bunches for the large pail and 1.5 bunches for each of the smaller pails.  Since I have two of each size pail (6 total), we will need about 10 bunches ($40)

I'm thrilled with how they turned out!

Lastly, remember my little DIY project for the pew decor?
We set aside a sprig of baby's breath to test this final project out too!

Perfect.  


Friday, May 1, 2009

DIY Invitations: The Tutorial I

Well folks, you've seen the invitations, the budget breakdown/supplies--here's how the invitations got made, start to finish:

I asked my talented cousin, Christie, of Paper & Ink Designs to help me with the graphic design portion of the tutorial.    Without further ado, the design process:

Thanks for having me, Katie!  As usual, I enjoyed your company and doing this project with you.  I guess you’d say it was payback for punching out thousands of flowers from construction paper for me for my wedding six years ago*.   So thank you and you're welcome.

*Editor's note: Christie got married in '03 and had lots of fun DIY projects...including asking some of her younger cousins to punch out paper for confetti so it would match her wedding colors :-).

Katie had a pretty good idea what she was looking for in an invitation; the colors were chosen, the outer shell had been found and the verbiage was written.  Now it was time to put that all together.  I had Katie sit down and search through www.istockphoto.com to find the right illustration to accompany her vision.  She was on the fence with a branch, a tree or a leaf, something natural anyway.  Well, she stood by her blog title “The Indecisive Bride” .  

tweaking, tweaking, and more tweaking.  (ps. isn't Christie's baby Izzy so cuuute?)

   After a couple hours of going back and forth finding the “one” (even texting the fiancĂ© “branch or leaf”), we finally landed on a layered illustration of berry branches, leaves and a flower.  We were able to utilize most of the layers, working them in on the invite itself and onto the info cards.  I altered the sizes and colors of each illustration to match the celadongreen in Katie’s color scheme.  I pulled the color from web image of the paper she purchased at Paper Source .  The flower was actually revised to fill the whole stem to create more of a dandelion than a perennial.  I took the top half (because it was layered), copied it and spun it around to fit the entire stem.  It was exactly what Katie was looking for, not too thick and not to sparse

the paper supplies from paper source and paper and more.

The cards on the right were filled with reply information, directions, a map and accommodations.  We utilized the other images on each of these cards, keeping with the natural feel but not overshadowing the over dandelion look.  She had already supplied me with the information, so we just had to organize it.  Each card was sized to fit ¾” above the over, so that all the titles could be seen at a glance.  (In some cases, I’d create all the sizes around the reply card as it may be a postcard with postal regulations or to fit in a supplied envelope.  For Katie, she chose to use her wedding website, an joint email address and a phone number – a more contemporary approach to reply cards, i.e. a way to go green).   

To finish off the invite, I set up small monogram squares featuring their initials.  Katie printed, cut and assembled them with double sided foam tape to give the pocket fold a good seal.  An elegant finish to a beautiful invite!

the monogram that I forgot to photograph actually sealing the invitations!  coming soon.

Being a graphic designer, I work on more advanced programs like Photoshop and Corel Draw.  These programs allow me to manipulate illustrations and images to create the visual needed.  I’m known around my peers for being a fontaholic and sometimes ask people to not watch me scroll through fonts – it gets a little dizzy!  I like a clean sans serif font combined with an elegant, but legible script font on most invitations.  It provides sophistication but a modern edge.  I used the same 2 fonts throughout Katie’s invitation.  I recommend only using 2 fonts asit can get too busy.  If you want, change it up by using the same font in all caps or in all lower case.  This shows more cohesion than throwing a bunch of cute fonts together.

I’ll let Katie take it from here (part two coming next week!)  I really enjoyed this project, as it’s a design that I’d do for myself and love the end product.  It was also awesome to have Katie stay with us for the weekend and spend time with her 2nd cousins.  If you have any questions about wedding invitations or are interested in having me work with you on designing yours, please email me at Christie@paperandinkdesigns.com.  

Wednesday, April 29, 2009

Budget Breakdown: The Invitations

I spent a lot of time with this in excel, but in order to paste it properly I had to make a screenshot of the spreadsheet.

I am very happy with the amount of money I spent on the invitations overall. I tried to gauge what the actual cost per invitation was for me including all factors, so I hope this is helpful for anyone else looking to DIY their invitations. I thought it was sooo worth it, but this was an important piece to me (read: i was a little OCD/wedding inspired) and I had lots of help.
This project was worth it to me--and I realize I could've spent a lot less (or a lot more!) on them. I saved where I felt I could (family design help and no reply card envelope), and splurged (the pocketfold and postage for it)

Please let me know if you have any questions--I'd be happy to answer them!

(oh, the one thing I forgot was $6 for the graphics we used, via istockphoto.com)

Tuesday, April 28, 2009

Custom Photo Guestbook winner!

Remember this giveaway?

We have a winner!!


Congratulations!

please email me: ericandkatiewedding [at] gmail.com or comment with your email address and I will send you the code to make your photo guestbook!

Thanks for entering, everyone!

Monday, April 27, 2009

The first dance

*stay tuned for the announcement of my photo guestbook giveaway winner!*

It's a dreary Monday, but this song just makes me a little bit cheerier.

I've had this on my Zune for months, and somehow never heard it until a couple of months ago, I knew this would be the perfect song.

Unforutately, E and i have very opposite tastes in music that only overlap in the case of pop-techno girl bands (Lady Gaga anyone?), and an occasional clubbing hip-hop song.  Otherwise, I love folksy, indie music and he loves little-known heavy metal and underground rap.

I played this song for E with my fingers crossed when he was visiting a couple weeks ago, and he approved!  

There are a million versions of this song (don't believe me, check it out here!)

but without further ado, here's Rosie Thomas and Ed Harcourt (dreamiest voice ever!) singing our first dance song.


Did you pick a first dance song just because it was cute (and didn't necessarily have a strong meaning for the two of you?)  Maybe that's unromantic, but it works for us!

Friday, April 24, 2009

Meet my invitation!

Well here's the post I've been waiting for. These are always my favorite blog posts because I love to see other people's invitations, and I can't wait to share mine with you!
I will be doing a DIY and cost breakdown post soon, but here is the completed invitation.

I had more than a glitch or two, and these babies were about 2.5 months in the making and I'm so glad they're gone!

My advice looking back?
  1. Spend the money on the RSVP envelopes and stamps. It's way more fun to get an RSVP in the mail than on your wedding website. Plus, it's classier and better etiquette. I really flubbed it on this one, looking back.
  2. Plan how to address the envelopes at least a month ahead of time, whether you hand-write them, print them, DIY calligraphy, or send them off to a calligrapher
  3. Get your addresses way ahead of time (I sent 5 invites out late bc I was still waiting on people to get back to me with their addresses)
  4. Double the spelling of names and titles (I inadvertently sent an invite to a pastor who recently earned his doctorate degree and did not include "Dr" but "Reverend. oops!)
  5. Get help! I seriously had so many friends and family members that wanted to help. My cousin and I created the design, my sister and BM Rae helped me cut and assemble, My friend Kim helped stamp, stuff and seal the envelopes. I wouldn't have been able to do it without you!!

Without further ado--my invitations!

(I hate to ruin the look, but gotta keep the privacy, ya know?)


envelopes (pre-ugly yellow heart stamp)


The back of the envelopes (I later added a clear address label to the top of the flap.)

(and I am so not a photographer. I'm thinking about asking a friend to take better photos of the invitation suite for my blurb planning album!)

And there you have it!
How long did it take you to DIY your invitations? Was it longer than you thought?
 

Latte Love All rights reserved © 2008-2011 | I am a HowJoyful Design by Joy Kelley