Showing posts with label decorations. Show all posts

Thursday, May 7, 2009

DIY Tutorial: Table Number Booklets

I saw this fabulous idea for table number booklets on OnceWed months ago and fell in love.

I took the DIY even a step further, and made the booklets instaed of just covering them.
In hindsight--I wish i would've found some pretty patterns, but the textured paper turned out so well!

First, I downloaded the font mom's typewriter from dafont, instead of purchasing the stamp used in the other tutorial. (saved $25 on the stamp)


Then I laid out the table numbers in Adobe InDesign (can easily be done in Word or Publisher!) to fit the print size 5 x 8.
I printed the booklet double-sided on plain white paper at home on a total of 36 pages. Free (saved $54 by not purchasing moleskin notebooks.)

I used all the same phrases listed in the OnceWed tutorial, but added "what should we name our firstborn?"  I know we'll get lots of great responses on that one, as it is sort of an inside joke with E and his married friends.

This is what the font looks like in the booklet:

Afer printing and trimming the inside pages, I got to workon the covers.  I purchased the cover paper from JoAnn Fabrics.  I had used that week's coupon for shepherd's hooks, so no discount.  We bought 7 8.5 x 11 sheets in 3 colors(brown, sage and ivory) for $.50 cents each= $10.50.  I bought a textured linen-like paper.

We looked high and low for numbers that would work and ended up using the extra paper from the boolet covers, and stencils my Aunt Jet had laying around the house. Free! (saved $8)  We traced the numbers with stencils and began cutting them out.  
You HAVE TO remember to trace the numbers backwards so that when they're done, the finished side shows the number facing the right way!  We had to throw a few out because I wasn't paying attention.


Aunt Jet measured the booklet covers so the number would be in the same place on every booklet, and traced light pencil lines.


Then we glued the paper numbers onto the booklet covers


I ended up using a mixture of colors for the booklets and loved how that turned out (i.e. ivory numbers on a brown booklet, brown numbers on a green booklet)  There are only three duplicates of each color combination in the 18 booklets.


Lastly we went through my Aunt Jet's big drawer of thread and picked out matching ivory, green and brown thread.  We stiched the booklet's bind just using a running stitch.  

I'll post pictures soon of the inside of the booklet and a closeup of the stitching.
The booklet will stand up nicely on it's own, so we won't have to have table number stands.

I love how this project turned out, and it was sooo cheap!


Budget breakdown

Font: free
white paper: free
cover paper: $10.50
stencils: free
krazy glue: $3

Total $13.50 for 18 table number booklets

Cost per table number booklet = $.75

Monday, May 4, 2009

DIY Tutorial: Baby's Breath Decor

With less than 50 days left, I understandably have lots to do.
But so many projects are done--I want to share them with you before life gets even busier!

I plan to DIY all my flowers, including decor for the ceremony and reception..and this post is just the beginning! 
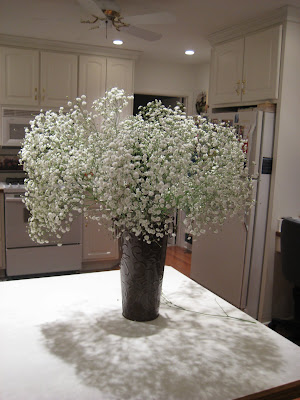
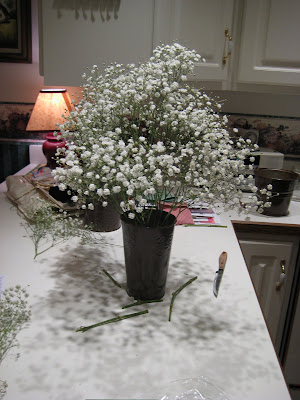
Last Wednesday, I met my Aunt Jet for some flower-experimentation.  She had bought two bunches of baby's breath for $4 each from the local grocery store.


Previously, we had purchased three galvanized pails in different heights and sizes, and spray painted them brown.  The brown made them match our theme better and added a little bit of elegance as these will be in the church for our ceremony decor.


We took some floral foam, and cut pieces that would fit in the bottom of each pail.  They have to fit snig if you are going to fill the pails with water.

After filling one pail with water and realizing it leaked, we found old margarine, sour cream, and cottage cheese tubs and used them inside the pots to hold the water.

We cut the stems into a couple of different heights and used the broken stems to fill in along the edges of the bucket.

We figured out that we'd need two bunches for the large pail and 1.5 bunches for each of the smaller pails.  Since I have two of each size pail (6 total), we will need about 10 bunches ($40)

I'm thrilled with how they turned out!

Lastly, remember my little DIY project for the pew decor?
We set aside a sprig of baby's breath to test this final project out too!

Perfect.  


Monday, December 8, 2008

my first big commitment

I did it. I finally made a decision on my centerpieces.

I've been looking almost non-stop on websites, in magazines, and at florists. I think I have been more concerned about my decorations than I have been about my dress!

My two biggest concerns were: keeping with my theme of woodsy, rustic, elegance--and finding something SUPER cheap!
Some other concerns: I wanted to put them all together myself, and if they needed to be last minute put together, they needed to be easy, I didn't want anything too tall, or too inconspicuous (hey, I'm working hard on these, they should be seen, right?!)

Here are just a few of the million ideas I've considered: (All photos should be credited towards theknot.com)


Aren't they all just so much fun?

I love the vase of apples...wish I was getting married in the fall!

But all these lovely pictures (and MANY more) were giving me idea overload. I couldn't pick what I wanted and just LOVE too many things to actually do.
Thank heavens for my wonderful aunt, who is doubling as florist, seamstress, and head wedding designer (though she would never claim the title!) finally convinced me to just make a decision and stick with it!


And I had C, my friend and BM (who is getting married just a month after us!) come along and help me to be decisive.

So we headed over to Hobby Lobby's half-price sale and I picked up these:


So 22 of these suckers were loaded into the cart...at a whopping $1.75 each!


I love them!
(And I may need to remember this in the future when I find a bigger, better idea and start getting bridal regret)

We'll be filling the bottom of the bowls with rocks (either white rocks or little river rocks, then water and mixing in white and green hydrangeas like these:


We'll tie raffia around the bowl (the bowls I got have a slight rim)

What a relief, and what a fun night with two wonderfully helpful people!

Here is C goofing around in florals


And Aunt E helping me pick a vase for my ceremony flowers...4 dozen white tulips in two big vases on pedestals at the front of church


I spent a total of $65 for 22 fishbowl vases, two large column vases and 4 rolls of rafia. Yay!

Another post on my thrifting for more decorations to come...


Latte Love All rights reserved © 2008-2011 | I am a HowJoyful Design by Joy Kelley