Showing posts with label details. Show all posts

Tuesday, June 15, 2010

We've got a Latte Love: The deets

Before I get to the partying all night, I wanted to share some of my DIY details of the day.
I sadly lost the motivation to post tutorials on many of these projects the few weeks before the wedding, so I would love to know if there's any interest in tutorials anymore!

My hair style (done by Toffee Nut's sister)
and hair flower (The "Katie" by Muscari Designs)

IMG_1349ed2


The rings and our ceremony program
IMG_9852ed


IMG_8138ed


Using baby's breath and leftovers from the bouquets!
church decor2
guest photo

101_3679
guest photo

IMG_0896ed


IMG_8956ed

DIY cylinders made from kraft paper, and freeze dried petals

IMG_0974ed

Reception

Floating candles in cylinder vases with submerged flowers
IMG_1304ed

lrg_Picture_065_9Ro0t7_0
photo by Stephen (DJ)


IMG_1312ed


(I'm a little bit bummed we don't have any really great pictures of our centerpieces...they got taken over by wine, water, butter, salt and pepper)
101_3693
guest photo

DSCF5582
guest photo

A little glimpse of one of my favorite wedding projects: our booklet/guest book table numbers
(I'll return to blog about how these turned out!)
101_3699
guest photo


Table Setting
lrg_Picture_033_Wkz4Th_0
photo by Stephen(DJ)


These Chinese take out containers plus a sticker with our names and wedding date, served as the favors to fill with candy
IMG_1300edbw2
also, the business card we created for free from Vista Print asking our guests to upload their wedding photos to Shutterfly.


I intended this display to have small boxes under the table cloth, to raise the height of some of the containers. Unfortunately it was one of a few things that got neglected by our venue coordinator.
lrg_Picture_045_LTghzR_0
photo by Stephen (DJ)

IMG_1297ed


Chocolate Fountain
we decided very early on to serve goodies with a chocolate fountain instead of cake (which neither E nor I are particularly fond of)

lrg_Picture_058_KNpHoM_0
Photo by Stephen (DJ)

IMG_1281ed

Hope you enjoyed these few details of the wedding day!

Friday, August 7, 2009

DIY Details: Card Box

And thus begins the DIY series---a.k.a. all the projects that I didn't get the opportunity to blog about pre-wedding. Hopefully this will be a good distraction while I wait to blog my recaps!

My original idea for a "card box" was to just have a lined basket to match the ones I used for our petal cones and programs. Like this one from Kaboodle:
But both the coordinator at our reception venue and all my family warned by against an uncovered card holder because of the risk of theft. Our reception was held at a coutry club where golfers or others might wander in and grab a card or two (I couldn't believe that! I was apalled when our coordinator said it had happened before.) So I was stuck. The only other option I'd heard of via Weddingbee was birdcages...and those just weren't my style.

I loved Mrs. Avocados' suitcases


but it still didn't solve the problem of a more secure card holder

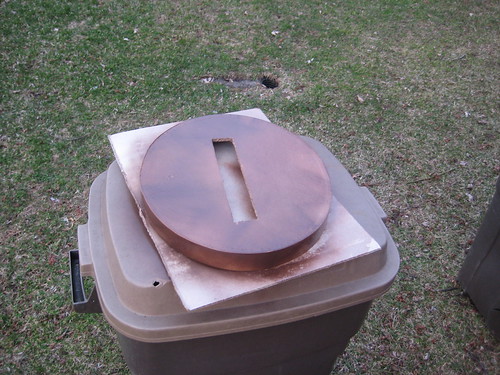
Then my wonderful aunt jet went up to her attic one one of our crafting days and came down with a box that looked just like this:

source

Then she got out a box cutter, brown spray paint, and a pile of silky cords in different shapes and sizes, all in my wedding colors! ("for embellishment" she said)
[Seriously, the jet's house/garage has any kind of crafting and building tool you can imagine.]

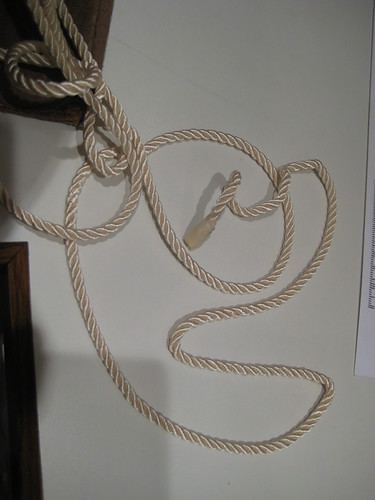
I picked this ivory colored rope and set it aside.

IMG_7164

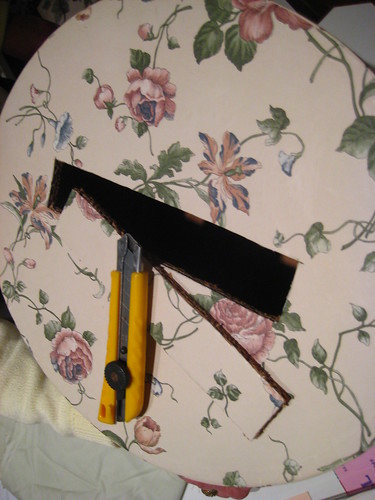
Then we started with the box. I took out the biggest greeting card I could find and used it to measure the hole, and added an inch. The hole was about 1.5" x 9". I cut it with the box cutter after tracing the lines with a ruler. Old hat boxes have really thick covers with several layers....so be careful when cutting!

IMG_7129
photo by me

Next, We had to change the color of that vintage floral wallpaper stuck to the box.
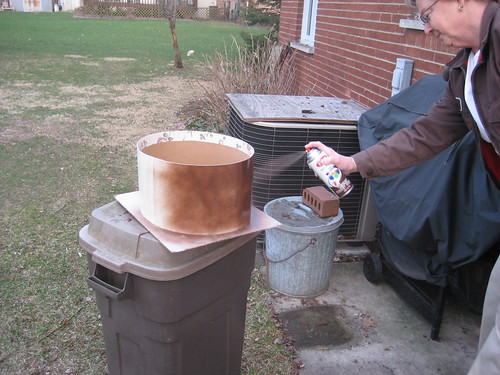
In order to neutralize the color, we started with 2 layers of white spray paint.

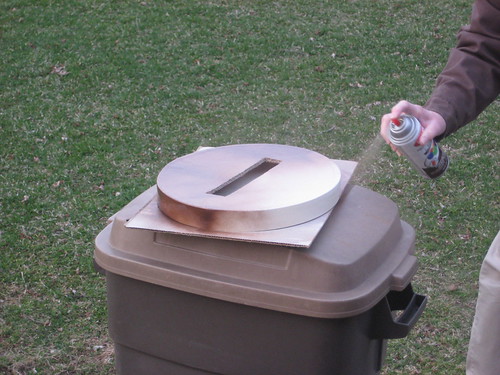
The next week, we got to work on the brown. Ok Aunt Jet got to work while I took pictures:

IMG_7162

IMG_7160

IMG_7161

We painted at least 3 coats if not 4, about 10 minutes apart. Then we left it for another hour or two to dry.

As I was contemplating how to decorate the box, I remembered Miss Taffy's post on Weddingbee about the rope signs she made for her seed-themed shower.
Voila! We had our card-box idea.

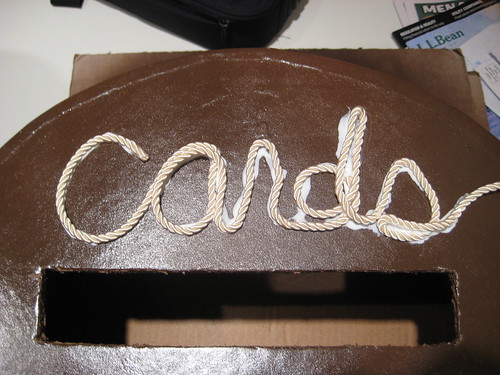
I carefully traced with white chalk the word "cards". After many tries and much erasing, I got out craft glue and traced the chalk, on letter at a time. I wrote it in cursive not because I liked how it looked, but because the rope frayed very easily and I didn't want to have to cut it more than at the beginning and the end.

After carefully laying the rope over the glue outlined letters, I held the rounded letters ("r" and "d" were the hardest to keep together) with my hand for 10 minutes or so until i was confident they wouldn't slide around.

My first try, I felt that the letters were too off center and disproportionate so type A me ripped the rope off the box. re-spray painted the top, and started over!

see how big the "c" and "a" are compared to the "d"? yikes!

IMG_7165

The second try was more successful (though still not centered!)

The glue dried within a day, completely clear....and this is what I ended up with!

photo by Uncle Cam


photo by Little Hands Photography

Wednesday, August 5, 2009

Just another tease

We interrupt our regularly schedule program to bring you....
more teaser photos!

I asked my photographer last week if she wouldn't mind posting a couple more photos for me to feast on while she edits and sorts through our 3000+ pictures. (What can I say...I'm an impatient lady!)

But I was duly rewarded when our photographer posted a few of the detail shots last night!

And here they are for all of you to see! (click to enlarge)


Monday, June 8, 2009

For your comfort: bathroom baskets

I bought these baskets for $5 from Michaels about five months ago when my wedding planning was all inspiration and DIY project ideas piling up. I love the liner!

I didn't want to leave this by the wayside, so last week at Aunt Jet's we put our heads together to make a list of goodies for the bathroom baskets.

Do you notice anything wrong with these pictures?

Girls'
Boys'

Anyone have any more ideas for the boys? Hair product? (and what to get?)
or do the boys just need fewer things in the bathroom?

In case you wondered, here's my list for the girls basket:
hairspray
air freshener
tampons
bandaids
drinking cups
flossers
body spray
lotion
hand sanitizer
advil
tissues

Thursday, May 7, 2009

DIY Tutorial: Table Number Booklets

I saw this fabulous idea for table number booklets on OnceWed months ago and fell in love.

I took the DIY even a step further, and made the booklets instaed of just covering them.
In hindsight--I wish i would've found some pretty patterns, but the textured paper turned out so well!

First, I downloaded the font mom's typewriter from dafont, instead of purchasing the stamp used in the other tutorial. (saved $25 on the stamp)


Then I laid out the table numbers in Adobe InDesign (can easily be done in Word or Publisher!) to fit the print size 5 x 8.
I printed the booklet double-sided on plain white paper at home on a total of 36 pages. Free (saved $54 by not purchasing moleskin notebooks.)

I used all the same phrases listed in the OnceWed tutorial, but added "what should we name our firstborn?"  I know we'll get lots of great responses on that one, as it is sort of an inside joke with E and his married friends.

This is what the font looks like in the booklet:

Afer printing and trimming the inside pages, I got to workon the covers.  I purchased the cover paper from JoAnn Fabrics.  I had used that week's coupon for shepherd's hooks, so no discount.  We bought 7 8.5 x 11 sheets in 3 colors(brown, sage and ivory) for $.50 cents each= $10.50.  I bought a textured linen-like paper.

We looked high and low for numbers that would work and ended up using the extra paper from the boolet covers, and stencils my Aunt Jet had laying around the house. Free! (saved $8)  We traced the numbers with stencils and began cutting them out.  
You HAVE TO remember to trace the numbers backwards so that when they're done, the finished side shows the number facing the right way!  We had to throw a few out because I wasn't paying attention.


Aunt Jet measured the booklet covers so the number would be in the same place on every booklet, and traced light pencil lines.


Then we glued the paper numbers onto the booklet covers


I ended up using a mixture of colors for the booklets and loved how that turned out (i.e. ivory numbers on a brown booklet, brown numbers on a green booklet)  There are only three duplicates of each color combination in the 18 booklets.


Lastly we went through my Aunt Jet's big drawer of thread and picked out matching ivory, green and brown thread.  We stiched the booklet's bind just using a running stitch.  

I'll post pictures soon of the inside of the booklet and a closeup of the stitching.
The booklet will stand up nicely on it's own, so we won't have to have table number stands.

I love how this project turned out, and it was sooo cheap!


Budget breakdown

Font: free
white paper: free
cover paper: $10.50
stencils: free
krazy glue: $3

Total $13.50 for 18 table number booklets

Cost per table number booklet = $.75


Latte Love All rights reserved © 2008-2011 | I am a HowJoyful Design by Joy Kelley