


I'm the last person that should be writing this post. I have almost no innate creativity and no experience working with power tools. But in week, I completed a home project I'd found on Pinterest (sadly, with no original photo source) and in the Design*Sponge book, that has been on my wishlist for a couple years.
I'm going to include a light tutorial, but please feel free to ask questions if you have them, and I'll do my best to answer! A friend (you just saw her beautiful wedding) and I worked on this project together. I had the inspiration/motivation to get it started, and she had the space, experience and power tools.
Here's what you'll need (I didn't have ANY of these tools or supplies before I got started. Most of you probably have some tools on hand already, but I'll include everything I used)
- Electrical cable reel (or spool). We picked up these spools at a local electrical supply company that literally had piles of them lying behind their warehouse. We were permitted to pick them up for free. (total score!)
- A power sander (like this, or a smaller version here)
- Cordless drill with screw-driving and drilling bit sets
- 1 inch spade drill bit
- Wood stain
- 2.5 inch screws
- Compass, or soft measuring tape
- 8 feet of 1 inch dowel rods (I used 5 pieces cut at 18" each and trimmed them up as needed)
- level
- wrench
- hammer
Ok! here we go.
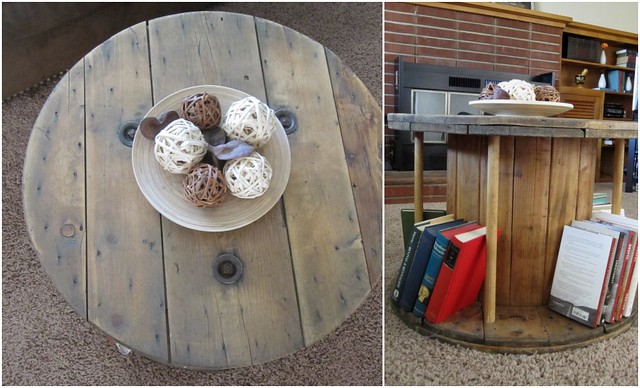
This is what the spool looked like when I got started.

(I had already removed a metal plate from the top)
First, hammer down the nails sticking out to make a smooth surface.
Then sand, sand, sand. My goal was to get rid of most of the stamped letters and paint on top and any other imperfections in the wood. I used the electric sander on the surface for probably an hour before it looked and felt like what I wanted. I lightly sanded the sides, the center cylinder, and the bottom up-facing surface, to protect from splinters. Then I took a piece of sand paper and hit some spots around the center hole by hand.
Then sand, sand, sand. My goal was to get rid of most of the stamped letters and paint on top and any other imperfections in the wood. I used the electric sander on the surface for probably an hour before it looked and felt like what I wanted. I lightly sanded the sides, the center cylinder, and the bottom up-facing surface, to protect from splinters. Then I took a piece of sand paper and hit some spots around the center hole by hand.

Once it was completely sanded, I wiped it gently with a damp washcloth, then brushed one layer of Ikea's Behandla wood stain on it. I stained the dowels as well and left both to dry. (Because I was working on this project at my friend's, I came back about 5 days later, but an overnight dry would have been enough.)
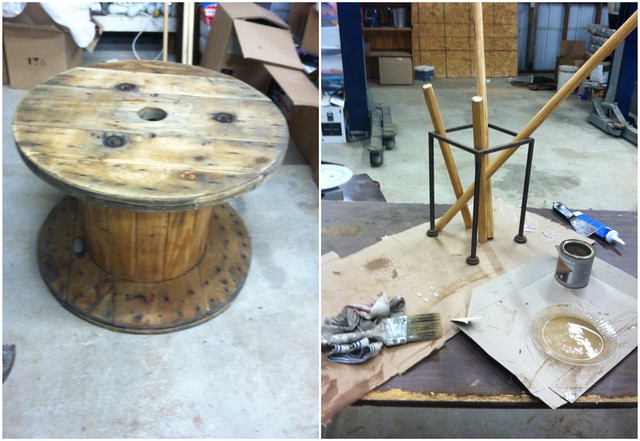
When the stain was dry I started marking out where I would install the dowels. This would have been much easier with a compass, so that's what I included above. I marked out 5 places where I wanted the dowels, about 18" apart and measured them halfway in from the edge, which was 2.5". I marked them on the inside of the top, and on the bottom.
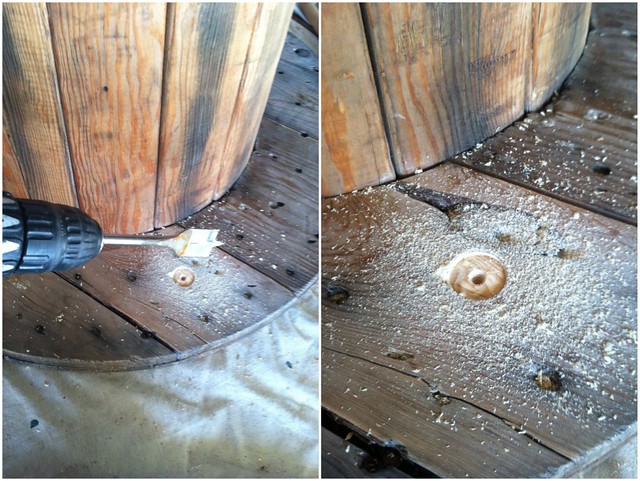
I drilled a 1 inch bevel for the dowel to sit in on the underside of the top (the table was upside down here). I measured the space carefully and added about 1/8" for the dowel length, and cut it. Placing one side of the dowel in the groove, I used a rubber mallet to hammer the dowel until it leveled evenly. Then I drilled a small hole for a screw through the bottom of the table and into the dowel, and screwed the flat end of the dowel to the bottom.

I did this around each point and then wiped the whole thing clean.

After getting it home, I decided I wanted another layer of stain on the top so I applied that, and then sprayed it with an indoor wood sealant to protect from water stains. 4 coats and 3 hours later, it was finished. (I was ready to bring it inside, but it smelled pretty strongly for 2 days afterwards so it should have probably be left out in a garage for a few days to air out.)
Total cost (to me): $40
Total time: 8 hours
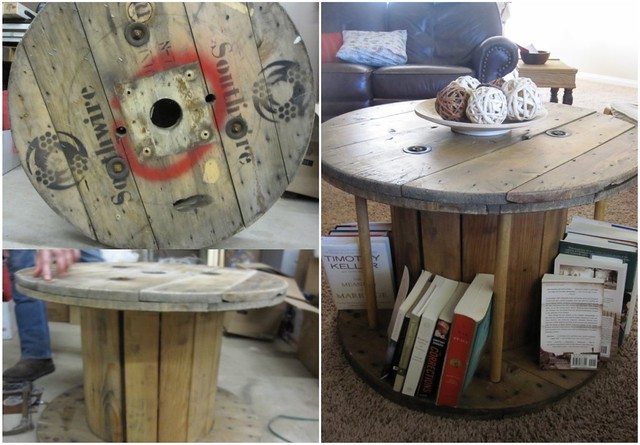
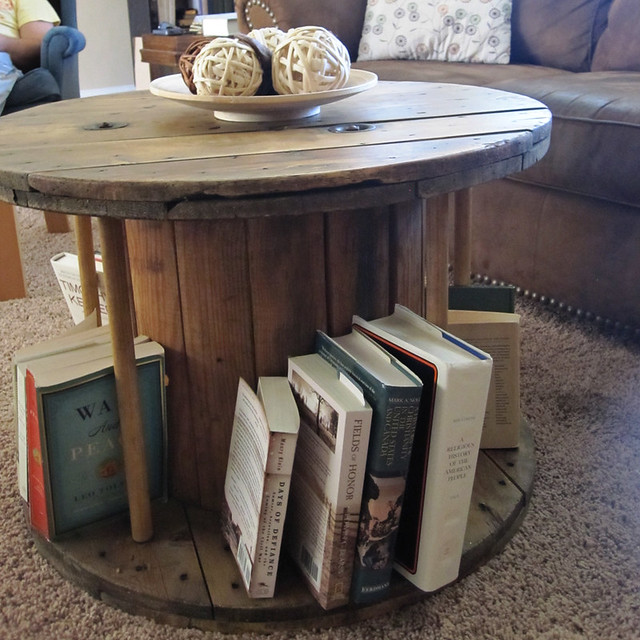
and then - ta da! We put some of our favorite books on display and I topped it temporarily with this decorative plate and bark balls from Ikea.


0 comments:
Post a Comment