Showing posts with label tutorial. Show all posts

Thursday, November 1, 2012

Style on the Road: Planning and Packing

I've traveled more often than I stayed at home in September and October, and I have to admit I'm not very good at trying to balance my normal life with flying all over the country. Two friends' weddings, one trip to see family, three work trips and it feels so good to be home!

IMG_1217IMG_1223

While on the road I try to travel light and in style, and I've gotten a few questions about it, so I thought I'd share some of my packing tips and tricks.
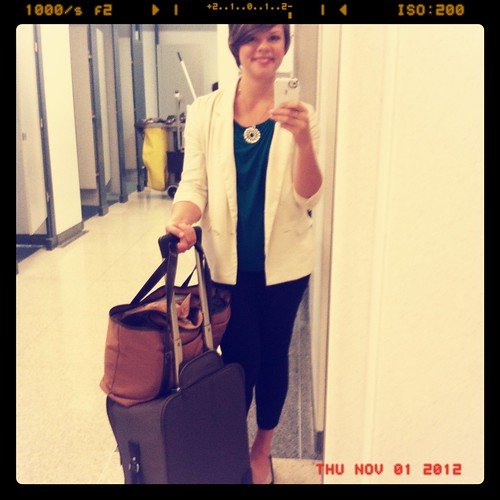
photo.JPG photo.JPG

On the plane
Some guidelines for what to wear when you're flying.
  • Classy, in case of a first class upgrade (!)
  • Comfortable, because all of my flights are cross-country and warm, because planes are cold
  • Versatile, so I can rewear it, because I pack with only a carry on - even for a ten day trip
  • Wrinkle-free, so I can look presentable if I have to meet anyone after 9 hours of travel
[One thing I should note is that I'm a grad school recruiter, so the dress code when I'm on the road can be pretty laid back. I never wear heels on a flight, or a suit.]

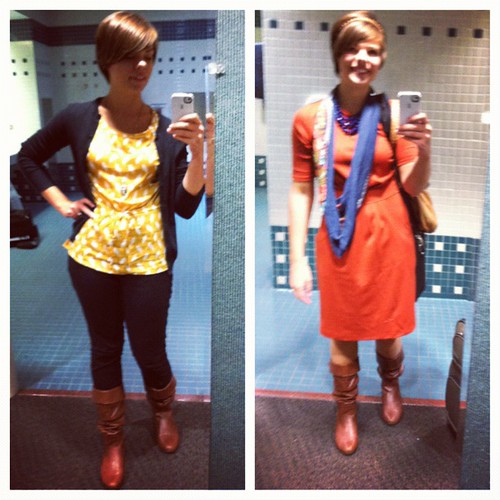
My favorite ensemble is:
Travel wear

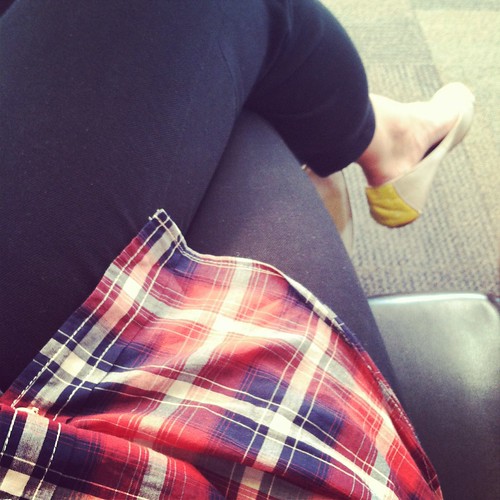
Travel wear by lattelove featuring slim fit pants
*denotes affiliate link
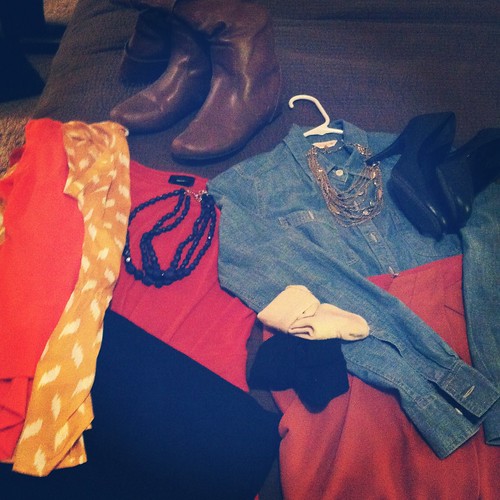
IMG_1160

In my suitcase
  1. Shoes. By far the hardest thing to pack is shoes - they're less easy to remix and take up so much space! On my last trip I was gone for ten days and my trip included a wedding, a visit to my family, and work - in places where temps ranged from 40-75. I would have preferred to have about seven pairs with, but I forced myself to bring only four: dressy sandals, black pumps, flat boots and brogues. Always wear boots on the plane, because they're a beast to pack.
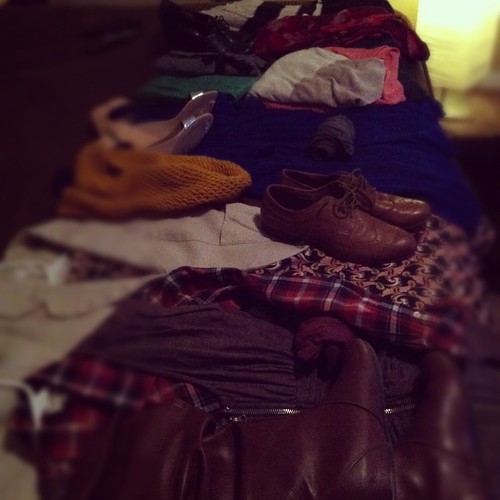
  2. Clothes that Mix and Match. This seems obvious, but is always harder in practice. The only way to guarantee what I'm bringing will work in several outfits is for me to layout all those outfits on my bed before packing. Every item needs to be worn at least twice - cardigan, blazer and pants should be remixable 3 times on a long trip. The only exception for me was the dress I wore to the wedding.
  3. Accessories. The only way I will pack or wear accessories is if I plan them as carefully as I plan my outfits.One of the most frustrating parts of travel for me is when I don't have my arsenal of belts, scarves, necklaces, earrings and barrettes or headbands to choose from each day. I take two belts - a utility and an accent belt, and put my jewelry in a cloth roll I bought on Etsy. I usually wear a scarf on the plane.
  4. Folding. I'm a fan of the rolling method, but I don't roll everything. Pants and dresses always get rolled and placed on the bottom, but tops do not. I usually bundle pack tops (see #2 here) where I stack all my tops together and fold them around another item.
  5. Packing: Some pro packers like the idea of putting clothing in a large clear ziploc bag so you can compress the air out of as much of your clothes as possible, and compartmentalize. I like this idea for delicate tops and shoes, but I don't pack anything else in plastic bags. I pack rolled items at the bottom with shoes, tops towards the bottom of the suitcase and toiletries go at the top of the suitcase near the zipper for easy access when going through security.
  6. Toiletries. Pack light on makeup. I take the smallest toiletries bag I own and typically bring one foundation-type product, mascara, eyeliner, two eye shadows, one blush and three brushes. Other than the foundation it fits in a snack-size ziploc bag. When I'm staying in a hotel or visiting my family I never pack a hair dryer, or shampoo/conditioner/body wash.
  7. Outerwear. Most of the time I'm traveling from a temperate climate (San Diego) to a colder climate, and have to pack a coat that I don't want to wear during travel. I travel with the coat thrown over my arm or my tote bag and then after loading in my carry on suitcase, I find a place where I can lay it flat over other items in the overhead bin. (*you should always to try to this after the plane has been boarded, because there may not be room, or you may have your stuff squished when someone tries to squeeze their luggage in too small a space.)
  8. Extras. Don't forget the little things! I always use a packing list, even though I know exactly what I'm packing so I don't forget things like: socks, the appropriate underwear, bandaids, feminine products, umbrella, glasses, medications.

Any questions? I feel like there are million resources out there with packing advice (here is one of my favorite collections: http://www.academichic.com/tag/packing/ ), but I hope this was helpful!

Friday, August 7, 2009

DIY Details: Card Box

And thus begins the DIY series---a.k.a. all the projects that I didn't get the opportunity to blog about pre-wedding. Hopefully this will be a good distraction while I wait to blog my recaps!

My original idea for a "card box" was to just have a lined basket to match the ones I used for our petal cones and programs. Like this one from Kaboodle:
But both the coordinator at our reception venue and all my family warned by against an uncovered card holder because of the risk of theft. Our reception was held at a coutry club where golfers or others might wander in and grab a card or two (I couldn't believe that! I was apalled when our coordinator said it had happened before.) So I was stuck. The only other option I'd heard of via Weddingbee was birdcages...and those just weren't my style.

I loved Mrs. Avocados' suitcases


but it still didn't solve the problem of a more secure card holder

Then my wonderful aunt jet went up to her attic one one of our crafting days and came down with a box that looked just like this:

source

Then she got out a box cutter, brown spray paint, and a pile of silky cords in different shapes and sizes, all in my wedding colors! ("for embellishment" she said)
[Seriously, the jet's house/garage has any kind of crafting and building tool you can imagine.]

I picked this ivory colored rope and set it aside.

IMG_7164

Then we started with the box. I took out the biggest greeting card I could find and used it to measure the hole, and added an inch. The hole was about 1.5" x 9". I cut it with the box cutter after tracing the lines with a ruler. Old hat boxes have really thick covers with several layers....so be careful when cutting!

IMG_7129
photo by me

Next, We had to change the color of that vintage floral wallpaper stuck to the box.
In order to neutralize the color, we started with 2 layers of white spray paint.

The next week, we got to work on the brown. Ok Aunt Jet got to work while I took pictures:

IMG_7162

IMG_7160

IMG_7161

We painted at least 3 coats if not 4, about 10 minutes apart. Then we left it for another hour or two to dry.

As I was contemplating how to decorate the box, I remembered Miss Taffy's post on Weddingbee about the rope signs she made for her seed-themed shower.
Voila! We had our card-box idea.

I carefully traced with white chalk the word "cards". After many tries and much erasing, I got out craft glue and traced the chalk, on letter at a time. I wrote it in cursive not because I liked how it looked, but because the rope frayed very easily and I didn't want to have to cut it more than at the beginning and the end.

After carefully laying the rope over the glue outlined letters, I held the rounded letters ("r" and "d" were the hardest to keep together) with my hand for 10 minutes or so until i was confident they wouldn't slide around.

My first try, I felt that the letters were too off center and disproportionate so type A me ripped the rope off the box. re-spray painted the top, and started over!

see how big the "c" and "a" are compared to the "d"? yikes!

IMG_7165

The second try was more successful (though still not centered!)

The glue dried within a day, completely clear....and this is what I ended up with!

photo by Uncle Cam


photo by Little Hands Photography

Monday, May 4, 2009

DIY Tutorial: Baby's Breath Decor

With less than 50 days left, I understandably have lots to do.
But so many projects are done--I want to share them with you before life gets even busier!

I plan to DIY all my flowers, including decor for the ceremony and reception..and this post is just the beginning! 
Last Wednesday, I met my Aunt Jet for some flower-experimentation.  She had bought two bunches of baby's breath for $4 each from the local grocery store.


Previously, we had purchased three galvanized pails in different heights and sizes, and spray painted them brown.  The brown made them match our theme better and added a little bit of elegance as these will be in the church for our ceremony decor.


We took some floral foam, and cut pieces that would fit in the bottom of each pail.  They have to fit snig if you are going to fill the pails with water.

After filling one pail with water and realizing it leaked, we found old margarine, sour cream, and cottage cheese tubs and used them inside the pots to hold the water.

We cut the stems into a couple of different heights and used the broken stems to fill in along the edges of the bucket.

We figured out that we'd need two bunches for the large pail and 1.5 bunches for each of the smaller pails.  Since I have two of each size pail (6 total), we will need about 10 bunches ($40)

I'm thrilled with how they turned out!

Lastly, remember my little DIY project for the pew decor?
We set aside a sprig of baby's breath to test this final project out too!

Perfect.  


Friday, May 1, 2009

DIY Invitations: The Tutorial I

Well folks, you've seen the invitations, the budget breakdown/supplies--here's how the invitations got made, start to finish:

I asked my talented cousin, Christie, of Paper & Ink Designs to help me with the graphic design portion of the tutorial.    Without further ado, the design process:

Thanks for having me, Katie!  As usual, I enjoyed your company and doing this project with you.  I guess you’d say it was payback for punching out thousands of flowers from construction paper for me for my wedding six years ago*.   So thank you and you're welcome.

*Editor's note: Christie got married in '03 and had lots of fun DIY projects...including asking some of her younger cousins to punch out paper for confetti so it would match her wedding colors :-).

Katie had a pretty good idea what she was looking for in an invitation; the colors were chosen, the outer shell had been found and the verbiage was written.  Now it was time to put that all together.  I had Katie sit down and search through www.istockphoto.com to find the right illustration to accompany her vision.  She was on the fence with a branch, a tree or a leaf, something natural anyway.  Well, she stood by her blog title “The Indecisive Bride” .  

tweaking, tweaking, and more tweaking.  (ps. isn't Christie's baby Izzy so cuuute?)

   After a couple hours of going back and forth finding the “one” (even texting the fiancĂ© “branch or leaf”), we finally landed on a layered illustration of berry branches, leaves and a flower.  We were able to utilize most of the layers, working them in on the invite itself and onto the info cards.  I altered the sizes and colors of each illustration to match the celadongreen in Katie’s color scheme.  I pulled the color from web image of the paper she purchased at Paper Source .  The flower was actually revised to fill the whole stem to create more of a dandelion than a perennial.  I took the top half (because it was layered), copied it and spun it around to fit the entire stem.  It was exactly what Katie was looking for, not too thick and not to sparse

the paper supplies from paper source and paper and more.

The cards on the right were filled with reply information, directions, a map and accommodations.  We utilized the other images on each of these cards, keeping with the natural feel but not overshadowing the over dandelion look.  She had already supplied me with the information, so we just had to organize it.  Each card was sized to fit ¾” above the over, so that all the titles could be seen at a glance.  (In some cases, I’d create all the sizes around the reply card as it may be a postcard with postal regulations or to fit in a supplied envelope.  For Katie, she chose to use her wedding website, an joint email address and a phone number – a more contemporary approach to reply cards, i.e. a way to go green).   

To finish off the invite, I set up small monogram squares featuring their initials.  Katie printed, cut and assembled them with double sided foam tape to give the pocket fold a good seal.  An elegant finish to a beautiful invite!

the monogram that I forgot to photograph actually sealing the invitations!  coming soon.

Being a graphic designer, I work on more advanced programs like Photoshop and Corel Draw.  These programs allow me to manipulate illustrations and images to create the visual needed.  I’m known around my peers for being a fontaholic and sometimes ask people to not watch me scroll through fonts – it gets a little dizzy!  I like a clean sans serif font combined with an elegant, but legible script font on most invitations.  It provides sophistication but a modern edge.  I used the same 2 fonts throughout Katie’s invitation.  I recommend only using 2 fonts asit can get too busy.  If you want, change it up by using the same font in all caps or in all lower case.  This shows more cohesion than throwing a bunch of cute fonts together.

I’ll let Katie take it from here (part two coming next week!)  I really enjoyed this project, as it’s a design that I’d do for myself and love the end product.  It was also awesome to have Katie stay with us for the weekend and spend time with her 2nd cousins.  If you have any questions about wedding invitations or are interested in having me work with you on designing yours, please email me at Christie@paperandinkdesigns.com.  


Latte Love All rights reserved © 2008-2011 | I am a HowJoyful Design by Joy Kelley